
segunda-feira, 24 de junho de 2013
segunda-feira, 17 de junho de 2013
Nagios no Centos 6.4
Vamos adicionar os repositórios
Para 32 bits:
# rpm -Uvh http://dl.fedoraproject.org/pub/epel/6/i386/epel-release-6-8.noarch.rpm
Para 64 bits:
# rpm -Uvh http://dl.fedoraproject.org/pub/epel/6/x86_64/epel-release-6-8.noarch.rpm
Agora vamos instalar os pacotes como php , apache ,gcc
# yum install gd gd-devel httpd php gcc glibc glibc-common -y
Instala o Nagios agora
# yum install nagios* -y
Define a senha do usuário nagiosadmin
# htpasswd /etc/nagios/passwd nagiosadmin
Inicia os servidor do Nagios , Apache
# service nagios start
# service httpd start
Coloque na inicialização os serviços
# chkconfig nagios on
# chkconfig httpd on
Pronto o Nagios já esta instalado para acessar digite o ip do nagios no seu browser
http://<ip do nagios>/nagios

Guia de Referencia:
sexta-feira, 14 de junho de 2013
Zpanel no Centos 6
Zpanel um painel de hospedagem de sites , emails , é muito fácil de instalar, assim mesmo se você é um novato, você não deve enfrentar nenhum problema instalá-lo no CentOS . Zpanel também está ativamente apoiado pela comunidade, que pode ajudá-lo a resolver a maioria das questões relacionadas com a instalação e configuração.
Zpanel utiliza os softwares opensource como:
- Apache Web Server
- Postfix MTA
- Dovecot IMAP/POP3
- ProFTP Daemon
- MySQL
- PHP
- Webalizer
- RoundCube
- phpMyAdmin
- phpSysInfo
Bom e sua instalação é muito fácil , já com o Centos instalado e atualizado vamos
para a instalação
Baixe esse pacote
# yum install ld-linux.so.2 curl -y
Agora baixe o instalador
# wget http://www.zvps.co.uk/sites/default/files/downloads/centos-6-3/package/installer-x86_64-install.sh.x.tar.gz
Descompacta o mesmo
# tar -zxvf installer-x86_64-install.sh.x.tar.gz
Execute
# ./installer-x86_64-install.sh.x
Pronto já esta instalado
no diretório onde baixou e executou o arquivo , após a instalação será criando um .txt com as senhas
"passwords.txt"
Agora é só digitar o ip no seu browser e pronto


Pronto já pode hospedar seu site , criar seu email já com webmail , conta ftp , etc...
Guia de Referencia :
http://www.zpanelcp.com
terça-feira, 4 de junho de 2013
oVirt no Fedora 18

Uma Dica rápida para a instalação do oVirt . Projeto de virtualização open source
após a instalação do Fedora vamos instalar o oVirt
Instale o seu repositório
# yum localinstall http://ovirt.org/releases/ovirt-release-fedora.noarch.rpm
Agora a instalação do oVirt
# yum install ovirt-engine -y
Adiciona no /etc/hosts um dominio com ip como por exemplo
192.168.1.5 ovirt ovirt.local
Agora digita no terminal
# engine-setup
E irá solicitar algumas informações
Welcome to oVirt Engine setup utility
oVirt Engine uses httpd to proxy requests to the application server.
It looks like the httpd installed locally is being actively used.
The installer can override current configuration .
Alternatively you can use JBoss directly (on ports higher than 1024)
Do you wish to override current httpd configuration and restart the service? ['yes'| 'no'] [yes] :
HTTP Port [80] :
HTTPS Port [443] :
Host fully qualified domain name. Note: this name should be fully resolvable [localhost.localdomain] : ovirt.local
Enter a password for an internal oVirt Engine administrator user (admin@internal) :
Confirm password :
Organization Name for the Certificate [localdomain] : ovirt.local
The engine can be configured to present the UI in three different application modes. virt [Manage virtualization only], gluster [Manage gluster storage only], and both [Manage virtualization as well as gluster storage] ['virt'| 'gluster'| 'both'] [both] :
The default storage type you will be using ['NFS'| 'FC'| 'ISCSI'| 'POSIXFS'] [NFS] :
Enter DB type for installation ['remote'| 'local'] [local] :
Enter a password for a local oVirt Engine DB admin user (engine) :
Confirm password :
Configure NFS share on this server to be used as an ISO Domain? ['yes'| 'no'] [yes] :
Local ISO domain path [/var/lib/exports/iso] :
Firewall ports need to be opened.
The installer can configure firewall automatically overriding the current configuration. The old configuration will be backed up.
Alternately you can configure the firewall later using an example file.
Which firewall do you wish to configure? ['None'| 'Firewalld']: Firewalld
oVirt Engine will be installed using the following configuration:
=================================================================
override-httpd-config: yes
http-port: 80
https-port: 443
host-fqdn: ovirt.local
auth-pass: ********
org-name: ovirt.local
application-mode: both
default-dc-type: NFS
db-remote-install: local
db-local-pass: ********
nfs-mp: /var/lib/exports/iso
config-nfs: yes
override-firewall: Firewalld
Proceed with the configuration listed above? (yes|no): yes
Installing:
Configuring oVirt Engine... [ DONE ]
Configuring JVM... [ DONE ]
Creating CA... [ DONE ]
Updating ovirt-engine service... [ DONE ]
Setting Database Configuration... [ DONE ]
Setting Database Security... [ DONE ]
Creating Database... [ DONE ]
Updating the Default Data Center Storage Type... [ DONE ]
Editing oVirt Engine Configuration... [ DONE ]
Editing Postgresql Configuration... [ DONE ]
Configuring the Default ISO Domain... [ DONE ]
Configuring Firewall... [ DONE ]
Starting ovirt-engine Service... [ DONE ]
Configuring HTTPD... [ DONE ]
**** Installation completed successfully ******
(Please allow oVirt Engine a few moments to start up.....)
**** To access oVirt Engine browse to http://ovirt.local:80 ****
Additional information:
* There are less than 4096 MBs of available free memory on this machine.
It is recommended to have at least 4096 MBs of available memory to run the oVirt Engine.
* oVirt Engine CA SSL Certificate SHA1 fingerprint: 08:E3:A8:C3:6E:07:8F:43:DD:91:09:00:04:34:BF:49:91:15:58:26
* SSH Public key fingerprint: d7:46:15:51:42:98:66:47:8d:7d:80:d1:a8:b8:30:2e
* A default ISO share has been created on this host.
If IP based access restrictions are required, please edit /var/lib/exports/iso entry in /etc/exports
* The installation log file is available at: /var/log/ovirt-engine/engine-setup_2013_06_04_21_48_25.log
* Please use the user "admin" and password specified in order to login into oVirt Engine
* To configure additional users, first configure authentication domains using the 'engine-manage-domains' utility
Pronto o oVirt esta instalado , para acessar digita no seu browser
http://<ip do servidor do ovirt>
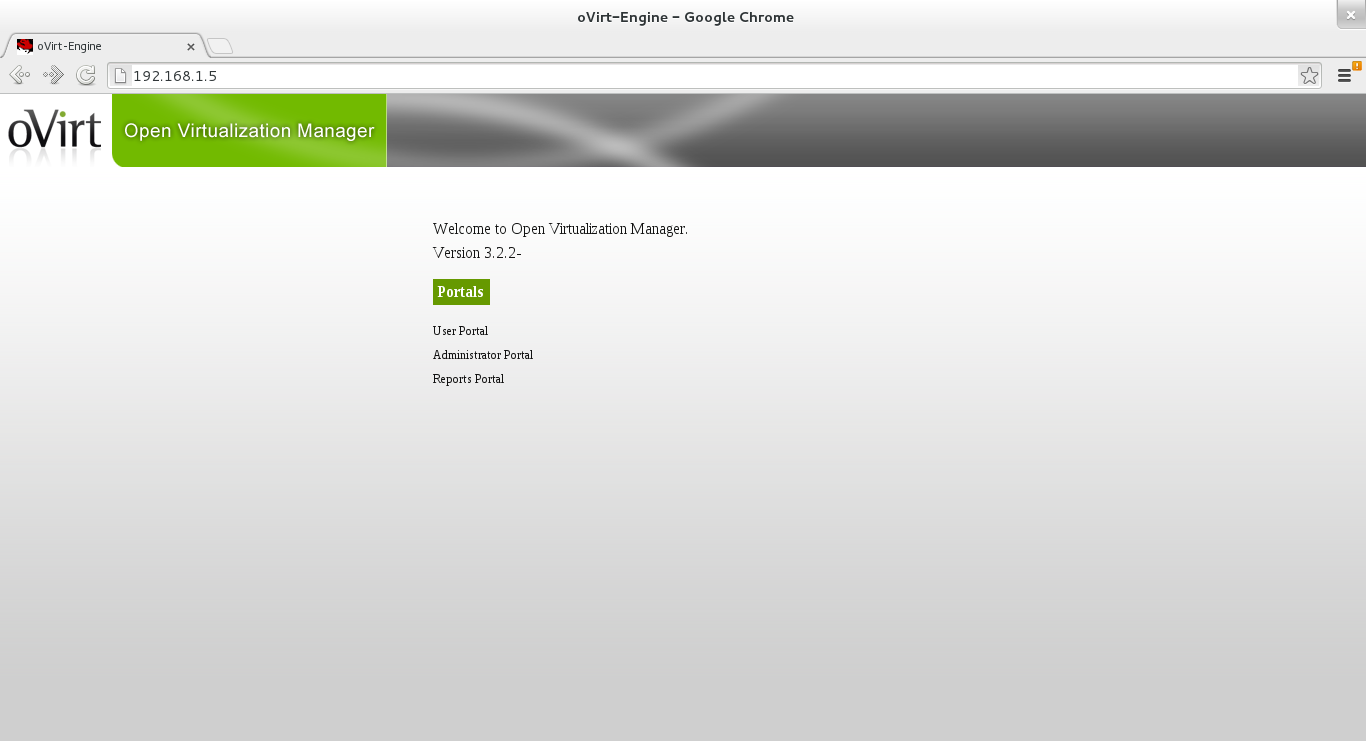
Agora clica em Administrator Portal
e coloca o usuário admin e a senha que tu definiu na instalação

Pronto já podes usar o oVirt

Guia de Referencia
www.ovirt.org
http://fedoraproject.org/wiki/Features/oVirt
http://mr-marcelo-barbosa.tumblr.com/post/51534117741/ovirt-all-in-one-no-fedora-18
Assinar:
Postagens (Atom)